Burn iTunes Movie Video and Protected TV Shows to DVD

Many friends ask me how to burn iTunes movies to DVD, so that they can enjoy their movies on large screen TV. For computer newbie, I will recommend them to get an Apple TV; it can connect your iTunes library to TV, the only thing you need to do is to sync movies from iTunes to Apple TV box. An Apple TV costs $299, if you think this is beyond your budget, you can use software to do that same thing, which is a lot cheaper.

Now, let me explain the details. Because movies and TV shows purchased from iTunes store have DRM copy-protection, you have to remove the DRM protection before burning them to DVDs for playback on your home DVD player.

What you need are: Aimersoft DVD Creator & Tunebite. You can download them from:

Part1. How to remove DRM copy-protect from iTunes purchased movie or TV shows?
Step1. Download and install Tunebite, just follow the installation wizard, this software will install several high-speed dubbings to speed up the conversion, when you see the pop up warning messages, just click "Keep on going" to finish the installation, which may take a few minutes.


Step2. Then run Tunebite, click "Add" button to load your iTunes purchased movies or TV shows, the default directory is My Document\My Music\iTunes\iTunes Music
In the "Convert Video to" drop down list, select "WMV7 (1024 kbps)", then click "start" to begin the conversion. If you don't know where the converted videos are saved, you can click "फोल्डर" to locate the files on your computer.

Tips: this software can also remove DRM from purchased music and audio books; it also works for other online stores such as Zune, Amazon, etc.


Part2. How to burn DRM-free iTunes video to DVD?
Step1. After you remove the DRM copy-protection from iTunes purchased movies, download Aimersoft DVD Creator and install it. (Note, you need a DVD Burner to burn DVD, so make sure your DVD Drive has DVD+RW or DVD-RW symbol)


Step2. Run Aimersoft DVD Creator, click "Load Video"button to import your DRM-free videos, and then drag the videos to the storyboard. If you want to burn videos to dual-layer DVD (DVD-9), at the bottom of the interface, select "DVD-R 9.0G", you can also customize video quality there. And the used disc space is shown on the disc space bar underneath the storyboard.


Step3. If you just want to burn itunes video to DVD without adding any special effects, just click the "Burn" tab. Here you will see the following options:
"Burn to": you can burn the video to DVD or create an ISO file on your hard drive.
"Drive": If your computer has multiple DVD burners, you can select any of them.
"TV Standard": NTSC is 30 fps. It's used in USA, Canada and Japan. PAL is 25 fps and it's used in Europe and Asia.
After the above steps, put a blank DVD disk into your drive and click "Start"to burn your movie.


Tip. You can use this software to add special effects to your videos and also create a DVD menu so you can use DVD remote control to control the playback.


How to Rip DVD and edit DVD Movie

This step-by-step guide will show you how to convert DVD to other video formats and edit DVD; it includes the following four sections:
1 How to convert DVD to AVI, MPEG, WMV, MP4, MP3, FLV, MOV, etc?
2 How to edit, combine and crop DVD movies?
3 How to rip audio from DVD to MP3 for iPod nano, shuffle and other MP3 players?
4 How to put DVD clips on Youtube, Myspace?


What you need is Aimersoft DVD Ripper; you can download it for free here:
http://www.aimersoft.com/dvd-ripper.html

If you want to rip DVD to AVI/MPEG/MP4/MOV/FLV/MP3 on Mac OS X such as Leopard, you can use Aimersoft DVD Ripper for Mac, it fully supports Intel processor and Power PC:
http://www.aimersoft.com/dvd-ripper-for-mac.html


Part 1. How to convert DVD to iPhone/iPod/PSP/Zune/Apple TV/Phone/Xbox/Zen/AVI/MPEG?

Step1. Insert your DVD disc into your DVD-Rom, then run the software, click “Load DVD” button and add the DVD file। You can also add DVD/IFO from your hard disk by clicking “Load File”


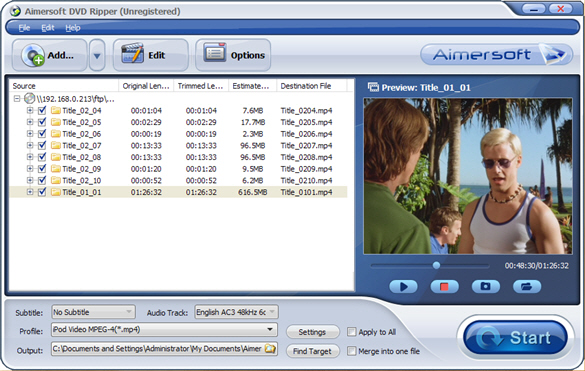
Step2. This software can convert DVD to various video formats such as MPEG-4, AVI, WMV, FLV, 3GP, VOB, etc. Click the “Format” drop down list to select a format. If you want to copy DVD to computer in 1:1 lossless quality, please select “Lossless DVD Copy (*.vob)”.


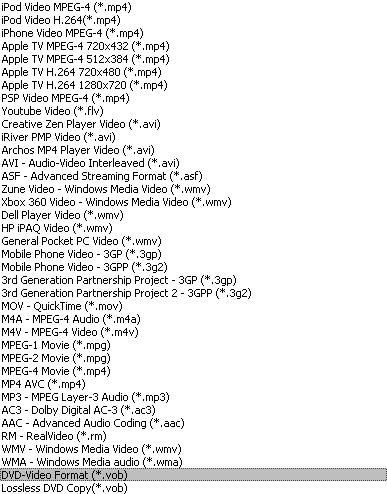
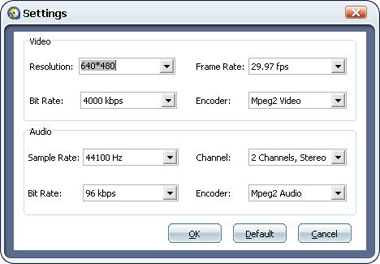
If you don’t know much about mobile players, just select a format according to the name of your mobile player. For example, if you want to copy DVD to the coming iPhone, just select “iPhone Video MPEG-4 (*.mp4)”, and the default setting works great. If you want to customize the output video, you can click the “Settings” button next to the format field to open the Settings window and set video resolution, frame rate, bit rate, encoder, etc. See the figure below:


Step3. Select Subtitle and Audio
Regular DVD movies usually have several subtitles such as English, French, German, etc. You can select one you prefer. You can also delete the subtitle by selecting “No Subtitle”. Selecting Audio is the same.


After the above steps, click “Start” to start conversion.


Tips:
If you want to copy DVD to iPod, this software has a free iPod Copy Manager; it can help you transfer the converted video to iPod directly without iTunes. Just connect your iPod to computer, click “Tools” -> “iPod Copy Manager”, then you will see a pop up window (See the figure below), the left pane is the video and music list on your computer, the right pane is the file list on your iPod (you also can copy files from iPod to computer, it’s useful if your computer crashes or you lose iTunes library), select the files you want to sync and click the right arrow button to finish the transfer.


For PSP, this software also provides a PSP Video Manager, click “Tool”-> PSP Video Manager, it fully supports all PSP firmware version (former 3.0 or 3.0 later), and the steps to transfer files to PSP is very similar.


Part2. How to edit, combine and crop DVD movie?
After you load the DVD file. If you want to cut the black edges of the DVD movie, you can click the “Crop” button, and then you will see a pop up windows (See the figure below). There is a frame in dashed line around the movie video; you can drag it to cut the black edges.


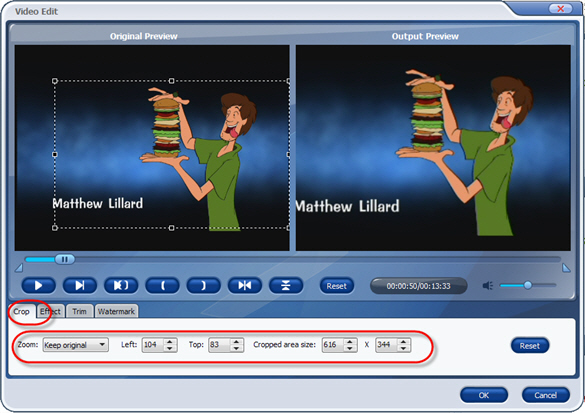
More over, you can click the Crop drop-down list to select a Crop model you prefer, for example: “Cut off top and bottom black edges”. You can even type the number in the box to cut off black border accurately.

If you want to combine several DVD chapters into one file, on the main interface, there is a check box “Merge into one file”, select it, then you will only get one output file instead of several files by chapters.

You can click the “Effect” button and customize the brightness, saturation, contrast, volume, etc (See the figure below). You can even apply special effects such as “Emboss”, “Negative”, “Old film” and “Gray” by selecting an effect from drop-down list.


Part3. How to extract audio from DVD to MP3 for iPod nano, shuffle, Zen and other MP3 players?
This software can extract and rip DVD audio track to MP3, WMA, WAV, AC3, AAC, M4A and so on, if you want to rip the music from DVD to your MP3 players such as iPod Nano, iPod Shuffle, Creative Zen, Zune and so on. After you load your DVD movie, in the main interface, select the output format as MP3, and then start conversion. If you want to get better music quality, you can select a higher audio bit rate and sample rate in the settings window.
After the conversion, drag the audio file to iTunes library, connect your iPod nano or iPod shuffle to your computer, and click iTunes “File -> Sync iPod”, OK. If you don’t have iTunes, you can download it for free from Apple official site
http://www.apple.com/itunes
For PSP, just copy the music to the “Music” folder on your memory stick.
For Zune, drag the music to the Zune software, and click “start sync”.


Part4. How to put DVD clips on Youtube, Myspace?
This software can convert DVD to FLV format for Youtube, Myspace and other video download sites. So you can share your own DVD clips with friends. After your movie is imported, select FLV as the output video format. Then log in Youtube, Myspace upload your video. But a whole DVD movie might be very large. By default, this software will convert the whole DVD to one file; if you just want several chapters of the DVD, you can just select the chapters you want to convert (you can preview the DVD clip before converting it).
Or you can click “Trim” button to open the trim panel, drag the trim bar to set start time and end time to convert a clip from your movie. You can also type the exact time values in the Set Start Time field and Set End Time field to trim video.


Note: Rip official DVD movie is illegal, so make sure you are authorized before you rip them.

The Powerful multimedia software on Mac - Aimersoft DVD Studio Pack for Mac now released

Aimersoft Studio now releases a powerful multimedia tool on Mac OS X - Aimersoft DVD Studio Pack for Mac, which includes three outstanding applications: Aimersoft DVD Ripper for Mac, Aimersoft Video Converter for Mac and Aimersoft DVD Copy for Mac.

Aimersoft DVD Studio Pack for Mac can help you rip DVD to computer with super fast speed, finish the conversion among all popular media formats and copy DVD with 1:1 ratio on Mac OS X.
As DVD Ripper for Mac, it can help you rip DVD to MP4, AVI, M4V, MOV, 3GP, MPEG, M4A, MP3 and other video and audio formats। As Video Converter for Mac, it can convert all common formats to your desired one. As Mac DVD Copy, it can help you copy DVD with 100% original quality and removing the DVD protections like CSS, RC and RCE.


Here are some key features of Aimersoft DVD Studio Pack for Mac:

1. Design for Apple Mac OS User: fully support Power PC and Intel Processors.
2. Perfectly compatible with all Mac OS X: support Leopard and Tiger.
3. Support all popular video and audio formats: including DVD, IFO, MP4, AVI, M4V, MOV, 3GP, MPEG, XviD, DAT, FLV, YouTube, Limewire, iTunes movie, QuickTime, camera record video, ASF and audio formats in MP3, M4A, AAC, WAV, OGG, APE, MP3, AAC, etc.
4. Support all popular portable player: including iPod, iPhone, PSP, Zune, Creative Zen, Sandisk, Sony, iRiver, Archos, Cell Phone, PDA, Blackberry, Pocket PC, PS3, Xbox 360, Nokia, Apple TV, etc.
5. Powerful DVD and Video editing functions: you can trim excrescent or special parts of movies, cut off the black edges, adjust brightness, contrast, audio, etc. You can also adjusting video brightness, contrast, and saturation, audio and apply special effect to video.
6. Join DVD Chapters and video clips: merge several DVD chapters or video files into a single file, and you can also rip the chapter or single video clip you want.
7. Support select DVD Subtitle and Audio Track, Extract Audio track from DVD and Video to MP3 AAC.
8. Copy DVD5 to DVD5, Copy DVD9 to DVD9 in 1:1 lossless quality. Burn DVD movie to DVD folder, backup DVD to your computer.


Availability and Suggestion

Aimersoft DVD Studio Pack for Mac is available now at:
http://www.aimersoft.com/dvd-studio-pack-for-mac.html
In order to provide better products for you, we are very appreciated to receive your feedback to us via the survey email: survey@aimersoft.com.

How to put DVD into Windows Movie Maker and iMovie

If you want to edit a DVD movie with Windows Movie Maker or import several DVD clips into Mac iMovie to build a new DVD, but you get frustrated with the DVD format, this guide may help you solve the problem.

Before you get started, it will be helpful if you learn something about the DVD, WMM and iMovie.
General DVDs have CSS copy protection in MPEG-2 or VOB format.
(Windows) Windows Movie Maker supports WMV, AVI and MPG video files.
(Mac) iMovie accepts MOV and MPEG4 video files.

This guide includes three parts;

1. How to put DVD movie into Windows Movie Maker.
2. How to add DVD clips to Apple Mac iMovie
Tip: How to convert MSWMM file to other video formats

Part1. How to put DVD movie into Windows Movie Maker

Step1. To put a DVD movie into Windows Movie Maker, you have to rip your DVD to WMV or AVI video first, and then you can load it into Windows Movie Maker. I’d prefer using Aimersoft DVD Ripper to do this. You can get this program at: http://www.aimersoft.com/dvd-ripper.html Then install and run it, put your DVD disc into your DVD drive, click “Load DVD” to locate your DVD file and import it, or load it by clicking “Load File” to add DVD IFO file. (This DVD Ripper can rip copyright protected DVD movies, but you should remember that it’s illegal rip DVD for any business purposes)


Step2. Select output format and subtitle
After you load the DVD files, click the format drop-down list to select “WMV – Windows Media Video (*.wmv)” or “AVI – Audio Video Interleaved (*.avi)” as the output format. A regular DVD movie has multiple subtitles and audio tracks, and you can select the right one for you. If you just want a certain part of the DVD movie, you can click “trim” to cut the DVD movie. Just drag the timeline bar to set the start and end time, and then blue line will be the captured parts.


For advanced user, if you want to output higher quality video, click the “Settings” button to open the panel, here you can customize video bitrate, audio bitrate, resolution, framerate, etc. Higher bitrate will result in bigger file size.

Step3. Start to convert
After the above steps, you just need to click “Start” and wait for the conversion to be finished. It takes about 40 minutes to convert a common two hours DVD movie.

Step4. Edit DVD with Windows Movie Maker (optional)
Run Windows Movie Maker, in the “Movie Task” bar, click “Add Video” to browse your computer and located the converted files, and then you can start to make personal movies.


Tips: Many users may wonder how they can convert Windows Movie Maker file (*.MSWMM) to other video format. Actually, A *.MSWMM file is not a video file. It is a project file of Movie Maker (more like a record file). You have to open this file in Windows Movie Maker and save the movie to your computer: Go to Movie Tasks bar > Finish Movie > Save to my computer. After that you will have a WMV file which can be converted to another video format or burned to DVD.


Part2. How to add DVD clips into Apple iMovie
iMovie is similar to Windows Movie Maker, it supports MOV and MP4 video, so you just need to convert your DVD movie to the right format. Aimersoft DVD Ripper has a Mac Version which supports both Mac OS Tiger and Leopard; you can download it for free from here:
http://www.aimersoft.com/dvd-ripper-for-mac.html
The operation steps are similar to the windows version, so I will not bother to repeat everything here.


When the conversion is finished, you can run the iMovie, build a new project, and then drag the converted files to the work space to make personal files.


When the task is finished, In the Menu bar, Click "File" -> "Export" and save it as QuickTime video, then you can convert it to other video format or burn it to DVD. If you need detailed info, here is a step by step guide about how to export iMovie project to QuickTime.